Thursday, October 31, 2013

Looking Back: October

When I look at back on October,
one very distinct theme comes to the surface...
Refashion Runway.
 
Seriously,
it completely enveloped my life!
I know it sounds strange, but I celebrated being 'free' by cleaning my room,
which was in complete and utter disarray after being so long neglected in favor of the sewing room.
 
And I didn't just clean, I cleaned.
Changed the bedding,
washed the curtains,
washed my mosquito netting canopy, (I have an East Indian themed room)
vacuumed cobwebs (I don't celebrate Halloween, remember...),
and did the laundry.
 
It was wonderful.
 
So really, not much else happened to look back on this month.
But here are a few shots that didn't make it into some of my refashion posts.
 

First, here are some great, creative pictures that my photographer took.
 My photographer: "Ok, we got the outfit pictures done, now we can have some fun!"

We took these last ones in an old barn.
He hoisted himself up onto the second level (there were no stairs)
and took these shots through a crack in the floor.


I love this one.
The fact that it is bigger than the other pictures doesn't give that away, dose it? ;)


And these he took from the same upper level looking down through a window.


Now for some funny faces...


 Oh yeah, and these.


We found a pile of broken glass...
and it gave me a brilliant idea.


Do you see it?


And then there was a peep hole in the wall.

 
So we did this.


And last but not least,
this little gem.


Imagine standing on one heeled foot, in soggy ground
(quite soggy in fact, we had a flood earlier that week.
No joke...12 inches in the course of a few hours...main street was a river...
we made the news...three times...a flood!)
....where was I?
Oh yes.
Imagine balancing on one high heeled foot on less than stable ground,
sticking your other foot out in front of you, with a bunch of extra weight on your posterior.
Needless to say, I lost my balance...and my wonderful photographer caught it all.
No need to worry, I didn't fall on my bum and muddy my beautiful dress,
luckily the bench was right behind me and I was able to light upon it with one hand and steady myself.
 
So there you have it!
Goodbye October, hello November!
 
 
(I would like to thank Jen over at Diary of a MadMama for inspiring me with
her hilarious GIF's (like this one) and telling me how I could make my own!
Thanks, Jen!)

Sunday, October 27, 2013

Refashion Runway 2: Winter White

It is hard to believe this is the last week of Refashion Runway,
or as my family has dubbed it, ‘Runaway’, challenge!
 It is true, during this competition it was easy to let an idea runaway with me!
 
And that was certainly the case with this week’s Winter White project.
Let’s just say, I almost bit off more than I could chew and nearly chocked!
As a pretty new sewist (sewer…? seamstress…?),
I had never worked with silky fabrics before…until this week when I picked up
a huge blue top and a lovely cream blouse which was busting buttons at the bosom.
 I also had a 100% wool pleated skirt which I planned to spice up.


Just a heads up,
this was a very difficult project for me, I was pretty exhausted from pushing so hard last week,
and to top it off, I was fighting off a little cold/allergies.
Translated, this means there aren't very many process pictures.
I was rushing against time and really just wanted to get it done!
Plus I was making it up as I went along!
Not to mention that everything that could possibly go wrong, did.
 
 
I had a vision for a two toned sort of illusion top,
 so I set to work tearing apart my shirts.


One of the shoulders was open, so I took off the buttons...


and the tie collar...


and the bottom hem, which had a small strip of elastic at one side,
and more buttons on the other.


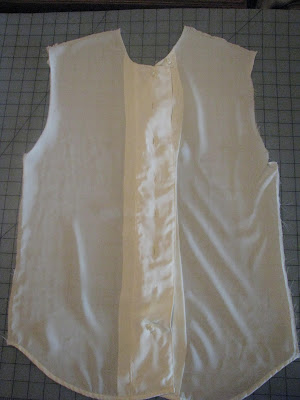
Then I removed the sleeves and collar from the cream shirt.


And separated the front from the back.


Some experimenting followed, resulting in a curvy silhouette pattern piece.
I folded my shirt piece in half, laid the pattern on the fold
and cut along the outside curved edge.


After cutting, this is what I had.


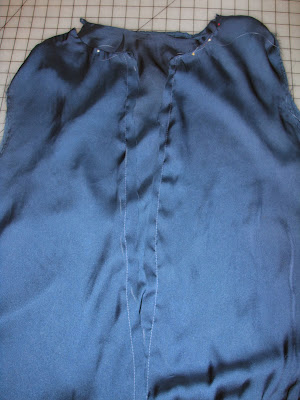
Returning to my blue top, I sliced it up the middle.
This shirt was made with two layers,
 so I basted them along the cut edges in an attempt to try and keep things all together.


I know there was some math and figuring involved at this point,
but honestly, it is all a blur.
I basically laid the cream piece over one side of the blue top...


...then traced the line where I wanted to connect it.


This material was fray ca-raaazy! This meant I needed to do French seams on everything.
So, I pinned my pieces together, with the seam on the outside.


After sewing that first seam, trimming the edge,
then folding over and sewing again, this is what one completed side looked this.
 
This basic process was repeated for the other side.


At this point, I was still working with a very large shirt,
so I pinned on the sleeves (which fit) so I could see where they ended.
This gave me the guideline for how much I needed to take in at the sides.


Even after taking in the sides,
there was still a lot of extra bulk in the back on account of the gathered neckline.
I resolved this by adding a series of pleats in the small of the back.


I also pinned and sewed the shoulders together.


This made the neckline in the front a little too high,
so I measured, chopped some off,
then covered it with bias tape.


This was concealed under the blue tie collar that I reattached.
(This process was tricky, frustrating and involved, so I'll spare you the details.)


After all the fitting changes were made,
it was time to connect the sleeves in earnest.


Because the sleeves were also attached with a French seam,
they ended up a little shorter than they ought to be.
The shirt was a little too stuffy with long sleeves anyway,
so I chopped off some length and made them 3/4 sleeves.


This of course left a raw edge,
with I trimmed with some of the blue scrap which
I collected from the hem of the shirt.


I attached the blue strip just like you would attach bias tape.
 
Once my shirt was finally done (!!!)
I turned my attention to the cream skirt.


To spruce up my skirt,
I simply straight stitched about a dozen rows around the bottom of the hem in deep blue thread,
varying the distance between each to create the appearance of bands.
I measured how far up I wanted my stitching to start, in my case it was 3 inches.
Then I made tiny marks all the way around so I had a guide for my fist row of stitches.
 
This was the same stitching method I used on my peplum top.
I really like it, I think it adds so much to a piece!
I'm tempted to go through my closet and do this to all my skirts!
 
And here it is finished up and paired together!


Here is the back.
 
 
With the shirt untucked, here is a better view of the pleats.


 In this photo shoot,
I have the shirt tucked in because it looked better that way with the skirt.
But I made sure to keep the length of the shirt a bit longer, since I have a long torso.
This top would also look great untucked with a pair of jeans or nice slacks!
 

 I really like how the sleeves turned out, trimmed in blue.
I'm really glad too that I shortened the length.
 
 
And here is close up of the hem stitching on the skirt.


Believe it or not, this outfit took all…stinking…week!
I seriously underestimated working with this silky polyester fabric,
which had me scurrying frantically to finish up what I thought was going to be a simple project.

 All in all, I really like the way my outfit turned out,
and I’m more than thrilled that I still have my sanity intact!
 
Now, head on over to The Renegade Seamstress
 
The overall winner and final placement of all four remaining
women will be determined by this week's scores and votes,
which will be announcement this Saturday!

Thursday, October 24, 2013

Disney's Jane Costume, a Refashion

(If you are coming over from The Renegade Seamstress, keep scrolling down,
 
G'day to you!
Recently I was given the challenge of refashioning an entire costume
for the competition Refashion Runway hosted by The Renegade Seamstress.
I had so much fun taking pictures of the finished product
that I decided it needed another post with more of the role play based pictures.
 
To see how I made this costume and what it was before, visit this post,
and don't forget to go vote for your favorite refashioned costume,
by clicking on this link!


You guys, seriously.
Look at my hair!
I was so proud that I was actually able to do something with it, and it turned out so good!


Tea?


Sketching...


"Oh dear, oh dear, oh dear, OHHH dear."


Being dramatic...


 "It's very nice."
"Oh, thank you, I can't do a thing with it in this humidity though..."


"And daddy...they took my boot!"


"Things couldn't possibly get any worse..."
A disheveled Jane.
 
 
 And for fun,
here are some edited ones.


And my three favorite edits...


Related Posts Plugin for WordPress, Blogger...