Showing posts with label refashion. Show all posts

Saturday, July 19, 2014

RED-y

Sometimes a girl just needs a little change.
Last weekend I decided to make that change, and it is one I've been planning since last fall...
I dyed my hair red!


Why red?
Because every time in the past that I have tried to color my hair a nice brown color,
it turns out with a red tint to it. I always tell them 'warm' tones, maybe that is where I went wrong...??
My grandma has told me that her hair always throws red when she tried dying it,
so maybe it is just in my hair code?
Anyway...I thought I would give in and actually color it red this time.
 I also did a little choppage while I was at it...just simple stuff...split ends, an attempt at layering in the back, and evening up my not-bangs.


Although this isn't the first time I've colored my hair, it is the first time I have done it at home by myself!
I was a little nervous, but once you jump in and get started, it really isn't rocket science.
I like the results fine, but I was hoping for that deeper, darker red tone, truer to the depiction on the box.
Just one week later, I already see it fading, even though it is supposed to be permanent.
Originally, I wanted to use Henna as a dye. But after a little research, I learned henna is very permanent.
You can't remove it or dye over it, or your hair might start smoking!
So, if I didn't like the red, I was stuck until it grew out.
I figured for $3 bucks I could get an ammonia free dye at Wal-Mart and do a far less scary test run.

Let me take this opportunity to draw your attention to the jean vest I'm sporting.
It was thrifted quite a few months back, but ended up sitting atop my large refashion pile
because it was just a bit too bulky.
Finally, I sewed some darts into the side seams and took it in. Simple fix.
It doesn't really qualify as a refashion, but I figured I could squeak it in this way.
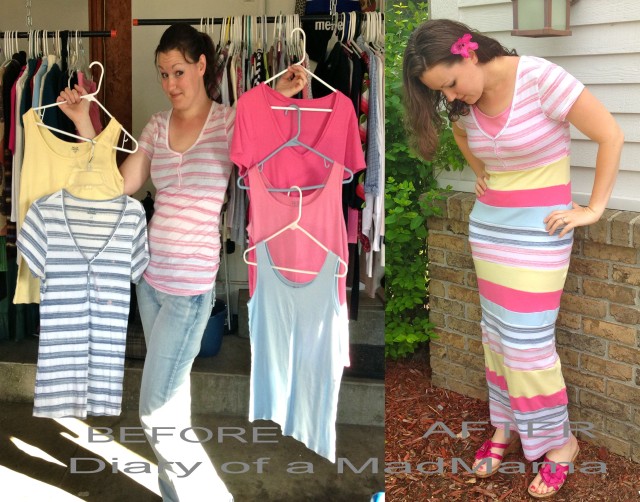
This top.
I am in love.
Also a piece that has been in my refashion pile for a long time. But I really don't know why!?
I literally pulled it out just a couple days ago and there is nothing wrong with it. 
I've been wearing it ever since- it is so comfortable and I just love the print. 
You can't tell with it tucked in, but it has a loose fit and rounded hem.

 
 And these shoes!
They are currently my favorite pair, and my most recent thrift score.
And when I say recent, I mean two months ago. I haven't been thrifting a lot lately.
Too busy and broke! That, and I feel bad buying more clothes when my refashion pile is overflowing!
(That might be a sign I need to get back to refashioning, huh?!)
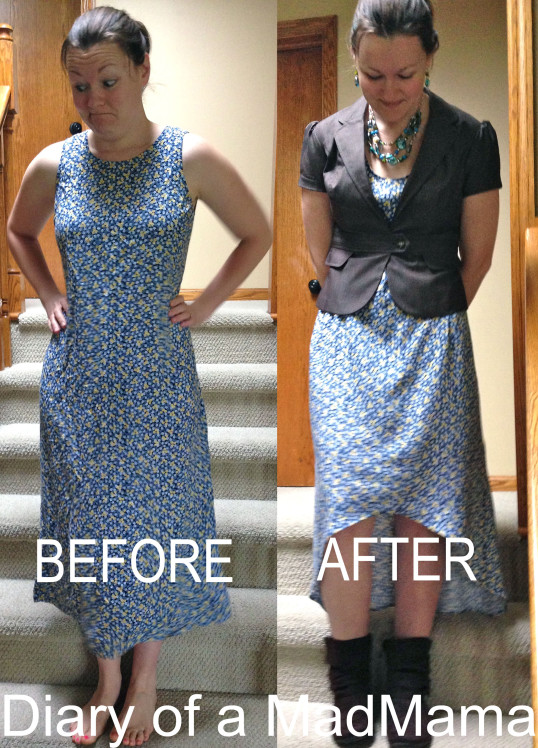
 Outfit: Jean Vest: thrifted ||Top: from a friend, Aeropostale ||Skirt: thrifted, refashioned 
Shoes: thrifted ||Belt: Bealls, old


How about you?
Is there a change you have been contemplating for a while?
Have you colored your own hair, and if so what products do you recommend?

Monday, March 10, 2014

Refashion Webinar with The Renegade Seamstress!

Most days I feel like a very little person in a busy world,
and then instances come along which snap that feeling to pieces.
One of those is the fact that I'm acquainted with such a talented person
like Beth, The Renegade Seamstress, who was recently asked
by BurdaStyle to host a live Web Seminar on refashioning!

BurdaStyle.
You guys, seriously! 
So exciting!

Have you ever wanted to learn how to refashion your wardrobe?
With this new Webinar, Beth will show you how to do just that!

For those of you with a visual learning style,
this will no doubt be a great tool, 
that just might hold the key to helping you step into the world of refashioning.

If you want to read what Beth has to say about it,

To find more information on the upcoming web seminar,
follow this link to BurdaStyle.

Here is a brief overview of the course.

Refashion: Inspiration and Projects 
to Revamp and Recycle Your Wardrobe
By Beth Huntington

 cardigan-conversion-after-5

Live Web Seminar Date: March 31st
Start Time: 11am EST (4pm GMT)
Length: 60 minutes
 
What You’ll Learn:
  • Reasons why refashioning is one of the most exciting movements in sewing today
  • Where to find inspiration
  • How to find great pieces at the thrift store
  • How to organize your stash
  • How to get over the fear of making that first cut
  • How to bring new life to second hand clothes
  • How to refashion a too small dress into a dress made just for you 


 Congratulations to Beth for such an exciting opportunity,
one I hope may interest some of you!
Go check it out!

Monday, February 24, 2014

Day 24: Guest Post with Diary of a MadMama!

Today, 
I am so pleased and excited to share with you one of my favorite bloggers!

I stay on top of all her posts, and look anxiously forward to each one!
Allow me to introduce to you, Jen from Diary of a MadMama!

Refashion Runway Competition: Week One Stripes | Diary of a MadMama


This t-shirt dress and the floral hi-low hem makeover below
 are just two (there are so many to choose from) of my favorite refashions from Jen...
can you tell I like dresses?


Jen

 I 'met' Jen through the very first Refashion Runway Competition,
held by Beth at Renegade Seamstress, and immediately singled her out as my favorite!
I've been following her ever since.

I love her sense of humor and creativity!
She does some of the most unique and 'out of the box' refashions I've ever seen.

I hope you enjoy her as much as I do!

~~~~~

Hello there!

Jen here, from Diary of a MadMama.

I am so honored that Desarae would so kindly ask me to be a guest blogger!
I have been blogging for a little over a year, and I've really enjoyed the journey so far!

Recently I refashioned the sleeves of these sweaters into fingerless gloves:

 Meh
Meh


Since all I used were the sleeves (and not even all of the sleeves), I still had a lot of sweater leftover.

Not wanting anything to go to waste, I thought of the perfect way to use up the leftovers...
A WINTER MAXI SKIRT!

I love the comfy-coziness of maxi skirts, and I HATE being cold
(especially this winter in Michigan, with arguably the worst winter weather I have ever experienced).
A maxi skirt made out of sweaters = warmth and style!

As a side note, I purchased the grey and red sweaters for 49-cents each at my local thrift store,
which fits my weekly "49-Cent Friday" blog series (the black sweater was given to me for free!).

The grey and red sweaters have strands of sparkly silver threads woven into them,
giving them a shimmery effect.

The black and grey sweaters are very stretchy, making them perfect for this skirt.
I mean, if the sweaters aren't stretchy enough, I'd end up walking like a geisha!

Since the red sweater had a higher wool content, it wasn't as stretchy,
so I decided to use it as the waistband (and top section) of the maxi skirt,
keeping the other (more stretchy) sweater pieces as the bottom of the skirt.

So to begin, I cut the sweaters across at the armpits like so:

Winter Maxi Skirt Refashion Tutorial | Diary of a MadMama
Snip!


Winter Maxi Skirt Refashion Tutorial | Diary of a MadMama
Snip!!


With the red sweater, I trimmed higher above the armpits to give myself more material, since I was using it as the upper, waist portion of the skirt.

Winter Maxi Skirt Refashion Tutorial | Diary of a MadMama
Snip!


I just trimmed down the sides a bit to make it smoother.

Winter Maxi Skirt Refashion Tutorial | Diary of a MadMama
Snip!


Using the brand-new serger I got for Christmas, I serged around the top of the red sweater...

Winter Maxi Skirt Refashion Tutorial | Diary of a MadMama
Pretty stitches 'eh?

...and then trimmed the ribbed waistband off of the black sweater:

Winter Maxi Skirt Refashion Tutorial | Diary of a MadMama
Snip!

After that was trimmed off, I placed the black sweater into the red sweater (wrong-sides together):

Winter Maxi Skirt Refashion Tutorial | Diary of a MadMama

And serged them together...

Winter Maxi Skirt Refashion Tutorial | Diary of a MadMama
Whirrrr...


Then I placed the grey sweater into the black sweater (once again, wrong-sides together):

Winter Maxi Skirt Refashion Tutorial | Diary of a MadMama

Once I serged that together, it was all done! And since I left the ribbed band on the grey sweater, the bottom was already finished.

Winter Maxi Skirt Refashion Tutorial | Diary of a MadMama

I love that the red sweater already is snug, which means I didn't need to add elastic.

This skirt is super comfy and I love it dressed up with my wide, black belt:

Winter Maxi Skirt Refashion Tutorial | Diary of a MadMama

By the way, what do you think of my slippers? ;)

Winter Maxi Skirt Refashion Tutorial | Diary of a MadMama

Winter Maxi Skirt Refashion Tutorial | Diary of a MadMama

I hope you like this quick and easy refashion.
Thanks so much for having me, Desarae! :)

~Jen


~~~~
I'm linking up at Anchored in Love Divine
for the Blog Everyday in February Challenge!

Monday, January 20, 2014

January Refashion Month Post


Today I'm sharing some of my hard earned refashion wisdom over to House of Estrela.
So head on over to read my post, Refashioning For Beginners!
 And while you are there, have a look around at the rest of the
wonderful posts being shared through this month's refashion series!

Thursday, January 2, 2014

January Refashion Month Blogging Party!

https://blogger.googleusercontent.com/img/b/R29vZ2xl/AVvXsEgm0vywwwwrNnNZLKtzRBv760qIwUD8FZNulVgElfr8PfrfouRv7fbbeGIjnBDYBlksNaQRYV8WnegygdmJAc0w1tojmUArv7QEbkaa0woPdkSg4tU_yrIDyMo-c9t_CODhoSjaNMWg274/s1600/button.jpg 

 Happy New Year everyone!
The beginning of a new year is one of my favorite times.
A time to wipe the slate clean, start afresh and separate yourself 
from anything in the previous year that would hold you down.

And, as person who exhibits OCD traits, 
I'm am so excited that we are now in an even numbered year! 
Yay! I can breathe easier now.

Having established all this,
I would like to share with you a fun way to get the year started off
on the right foot...and what better foot than the one on your sewing machine!

Some of you may remember Magda who blogs at House of Estrela
from Season Two of Refashion Runway.
 Well, Magda is hosting a month long refashion party of sorts,
with guest posts the blogworld over bringing you their best refashions,
tutorials, and how to's!

This is such a fun way to bring together a community of 
talented ladies and bloggers!
I am excited to be part of this month's line up
and look forward to checking in day to see what the rest of the ladies
bring to the sharing table!
I hope you will check it out and follow along too!
Follow this link to see the very first post of January Refashion Month.

Monday, December 30, 2013

Top 5 of 2013
Hits

 Hello my dear faithful-even-when-I-don't-post-for-a-month followers!

I don't know about you, but this past month was so busy
 that blog posts were the last thing I was worried about. 
I'll admit, I did worry about it a wee bit, but hey, the reality is I have a life, you have a life, 
and that life won't end if I don't post anything on my little blog.

Aside from being busy completing a large order of my mermaid crochet dolls, 
making some (though sadly not all) of these DIY Christmas gifts,
 I also dealt with an illness immediately following Thanksgiving 
that could have landed me in the hospital. 
I still have a few issues that I need to deal with, 
but I was able to get my body back up to relative health.

Anyway...
As things have settled down a bit,
I have been doing some catching up on my blog reading, another thing that didn't happen over the holidays, and I have been seeing the Top 5 of 2013 posts at several blogs I frequent.
It sounds like a fun idea, so I thought I would hop on the last passing wagon!

Here is my list for...

 Top 5 of 2013: Hits


http://crafting-a-rainbow.tumblr.com/post/70085318438/join-me-in-posting-your-top-5-lists-for-2013


5. Minty Teal Shirt Refashion


This was a pretty easy refashion, more of a fitting job, really, than an overhaul.
But with a few little fitting tweaks and by taking off the collar,
I completely changed the fit and style of this shirt.
It quickly became one of my favorite wardrobe pieces!

4. Bubble Hem Denim Maxi Skirt Refashion


Again,
this was a pretty simple refashion.
By combining a too-small pair of jeans and a hardly-worn skirt,
I created a fun maxi skirt that I absolutely fell in love with.
All of the extra width of the skirt was gathered at the front by using a box pleat,
and this created a flowing, draped effect at the front of the skirt.
This was in strong rotation during the warmer months of summer,
and I can't wait to pull it out next season!


3. Peplum Jacket Refashion


Those of you who followed me
during the Refashion Runway challenges will remember this jacket.
 I am super proud of how it turned out, and I love all of the little details...
lightly puffed sleeves, pin tucked seams in front and back, extra buttons
and lovely metallic and burgundy thread stitching detail.
Plus, as a budding seamstress, this held many firsts, including drafting
my own peplum pattern.


2. Medieval Costume


My first real refashion challenge this past year
came when one my younger brothers needed a medieval costume
as part of his camp counselor outfit for their weekly medieval banquet.
After a thrifting trip, we came up with just the right pieces
and I was able to make a shirt, vest, cape, hat, leg wraps,
 and even the cape clasp from thrifted items!
His outfit was a hit and I was more than thrilled with the final results.


And now, for my most favorite refashion and sewing project from this year...
I give you ...

1. The Jane Costume 


Also another project from the Refashion Runway Season 2,
this is for certain my crowning achievement of 2013!
In the midst of this project, I was under pressure and a bit stressed,
but looking back, I had lots of fun putting together the details and seeing things take shape.
The best part of course was seeing the finished costume and dressing up for a fun photo shoot.


And there you have it,
my top five hits from this past year!

When I take into account that I haven't yet been sewing for a complete year,
I am so excited and pleased to look back and track my progress.
I can't wait to see what this coming year has in store!

I would like to thank Gillian over at Crafting a Rainbow
for coming up this great year end review idea!

Thursday, November 7, 2013

Behind the 'Seams' of Refashion Runway, a Look Back

At the beginning of Refashion Runway,
I purposed to at least make it to the Peplum challenge.
But God gave me the continued grace and inspiration to far exceed those expectations!
 
  I was SO ecstatic when I first found out Beth from Renegade Seamstress
had selected me to be a part of the second season of Refashion Runway!
Little did I know I would make it to the final round and place Fourth Overall!

There wasn't a single week in this competition that I didn't do something I hadn't done before.
As a result, I feel my skills have more than doubled since I first started.
 
Here is a little look back at each one of the six challenges,
and a little 'behind the scenes' info you didn't get in the previous blog posts.


I was running off of pure adrenaline for this project!
On Friday I got word that I had been accepted into the contest, and my project was done by Sunday.
I already had a piece on hand to refashion, which made it that much quicker.
And honestly, it was not cool enough to be wearing these boots...I was baking!
This is Texas after all.
 
 
Week 2, Emerald Green


This one took me the longest out of all six projects to complete.
I just couldn't get a vision for this piece.
I started working on it still in the first week of competition, and I didn't get it finished
until the following Wednesday, so about nine days!
A lot of that time, it just sat there and I wondered what to do with it.
It is the piece I least like of all my RR projects.
This one came together through prayer and encouragement.
I dubbed it The Green Monster.


This was only the second peplum I've made,
and really, I was NOT impressed with the first one.
But it gave me a clear vision on what I DIDN'T like about peplums,
so I was able to change up the look for this RR project and up with something I did like.
This was a pretty smooth project, I didn't have any bumps or setbacks with this one.
As far as trying new things went, this one probably ranked up at the top.
This was really the first time I had drafted a pattern before.
I also had never sewn a button hole the right way with my machine,
AND I had never used bias tape to finish off inside seams (similar to a Hong Kong seam).
When it was finished, I felt pretty proud, it was one of the most classy pieces I've made so far.
And it was in one of my favorite colors.


This one scared me.
At the onset of the competition, I knew this one would be a biggy!
I tried to focus on one week at a time, not thinking ahead until I was finished with the present job.
But this one kept sneaking into my thoughts.
Honestly, I wasn't sure that I would make it to this round when I began the competition,
so it required a special thrift store trip to find a leather piece to work with.
If the Emerald challenge was the hardest inspirationally, the leather one was the hardest technically.
It nearly got the better of me, but I told myself that if others could sew on leather, so could I!
It took a lot of research and some special tricks, but in the end I got it.


Coming off the leather project,
 I was going into the costume challenge with less than a full tank of emotional energy.
I had a hard time deciding on what I wanted to make,
and when I made the first of four thrift store stops, I had three different projects in my head.
I actually broke down into tears at Goodwill after more than an hour with still no clear direction.
I was still buying pieces on Monday, just four days before it was due!
 
Despite the bumpy start, I was able to settle on an idea, find what I needed, and get the project done.
There were more tears involved when I thought I had broken a zipper after three tries to get it sewn in, and there was more than once that I had to ask God for help. But it got done!
Up to this point, this was the latest I had worked into the week to complete my project,
finishing up on Thursday night!
I was still stressed though because we were supposed to get a bunch of rain the next day,
and I was worried about getting the pictures done.
As it turns out, the pictures I was most worried about turned out to be the most fun I had taking pictures! We got up early and had a great time freezing our hands off in the chilly dampness for a great shoot!
God is funny that way, isn't He?


Putting all niceties aside, this was kind of like my week of hell.
I had pushed long and hard with my costume project, and by this point, I was pretty much exhausted.
I got started late in the week (Tuesday, four days before deadline) because I was so worn out.
When I finally set myself to the task, I realized I had picked a very difficult fabric to work with.
What I wanted to do seemed pretty straight forward,
but the fabric made it three times harder and five times longer to get done.
The entire week I took two steps forward, one step back.
There were lots of tears. Lots of chocolate. And LOTS of support from my family.
But this week was honestly fueled by prayer and the shear grace of God.
I probably prayed hourly asking for clarity of mind
(I was making so many uncharacteristic mistakes), strength and support.
There was more than one day I was ready to give up and I seriously doubted
having a completed project to submit by the deadline.
On top of all that, I was getting sick with a cold my last two days of sewing.
But it happened.
I actually finished and God even gave me a wave of strength to cross over the finish line with a smile to show in the 'after' photos.
This top was pretty much my miracle piece!
 

 Finally, finally, I was finished with it.
Completely finished. No more projects to submit.
I had made it through the complete season of Refashion Runway!
 
Honestly, it didn't matter a whit what place I got, the real accomplishment was that
I had given my best, conquered every challenge and held my own amongst the company of
some extraordinarily talented women, all of whom had been doing this a lot longer than me!
 
And on top of that,
I met all of you!
 
Thank you to everyone who left comments, voted, and generally encouraged me each week!
 
Honestly, without my supportive family
and my very talented, patient brother who took all of the amazing photos,
AND without everyone's encouragement and comments
I would not have been able to make it as far as I did.

So here is to a very successful and unforgettable second season of Refashion Runway.
We did it, y'all!


Sunday, October 27, 2013

Refashion Runway 2: Winter White

It is hard to believe this is the last week of Refashion Runway,
or as my family has dubbed it, ‘Runaway’, challenge!
 It is true, during this competition it was easy to let an idea runaway with me!
 
And that was certainly the case with this week’s Winter White project.
Let’s just say, I almost bit off more than I could chew and nearly chocked!
As a pretty new sewist (sewer…? seamstress…?),
I had never worked with silky fabrics before…until this week when I picked up
a huge blue top and a lovely cream blouse which was busting buttons at the bosom.
 I also had a 100% wool pleated skirt which I planned to spice up.


Just a heads up,
this was a very difficult project for me, I was pretty exhausted from pushing so hard last week,
and to top it off, I was fighting off a little cold/allergies.
Translated, this means there aren't very many process pictures.
I was rushing against time and really just wanted to get it done!
Plus I was making it up as I went along!
Not to mention that everything that could possibly go wrong, did.
 
 
I had a vision for a two toned sort of illusion top,
 so I set to work tearing apart my shirts.


One of the shoulders was open, so I took off the buttons...


and the tie collar...


and the bottom hem, which had a small strip of elastic at one side,
and more buttons on the other.


Then I removed the sleeves and collar from the cream shirt.


And separated the front from the back.


Some experimenting followed, resulting in a curvy silhouette pattern piece.
I folded my shirt piece in half, laid the pattern on the fold
and cut along the outside curved edge.


After cutting, this is what I had.


Returning to my blue top, I sliced it up the middle.
This shirt was made with two layers,
 so I basted them along the cut edges in an attempt to try and keep things all together.


I know there was some math and figuring involved at this point,
but honestly, it is all a blur.
I basically laid the cream piece over one side of the blue top...


...then traced the line where I wanted to connect it.


This material was fray ca-raaazy! This meant I needed to do French seams on everything.
So, I pinned my pieces together, with the seam on the outside.


After sewing that first seam, trimming the edge,
then folding over and sewing again, this is what one completed side looked this.
 
This basic process was repeated for the other side.


At this point, I was still working with a very large shirt,
so I pinned on the sleeves (which fit) so I could see where they ended.
This gave me the guideline for how much I needed to take in at the sides.


Even after taking in the sides,
there was still a lot of extra bulk in the back on account of the gathered neckline.
I resolved this by adding a series of pleats in the small of the back.


I also pinned and sewed the shoulders together.


This made the neckline in the front a little too high,
so I measured, chopped some off,
then covered it with bias tape.


This was concealed under the blue tie collar that I reattached.
(This process was tricky, frustrating and involved, so I'll spare you the details.)


After all the fitting changes were made,
it was time to connect the sleeves in earnest.


Because the sleeves were also attached with a French seam,
they ended up a little shorter than they ought to be.
The shirt was a little too stuffy with long sleeves anyway,
so I chopped off some length and made them 3/4 sleeves.


This of course left a raw edge,
with I trimmed with some of the blue scrap which
I collected from the hem of the shirt.


I attached the blue strip just like you would attach bias tape.
 
Once my shirt was finally done (!!!)
I turned my attention to the cream skirt.


To spruce up my skirt,
I simply straight stitched about a dozen rows around the bottom of the hem in deep blue thread,
varying the distance between each to create the appearance of bands.
I measured how far up I wanted my stitching to start, in my case it was 3 inches.
Then I made tiny marks all the way around so I had a guide for my fist row of stitches.
 
This was the same stitching method I used on my peplum top.
I really like it, I think it adds so much to a piece!
I'm tempted to go through my closet and do this to all my skirts!
 
And here it is finished up and paired together!


Here is the back.
 
 
With the shirt untucked, here is a better view of the pleats.


 In this photo shoot,
I have the shirt tucked in because it looked better that way with the skirt.
But I made sure to keep the length of the shirt a bit longer, since I have a long torso.
This top would also look great untucked with a pair of jeans or nice slacks!
 

 I really like how the sleeves turned out, trimmed in blue.
I'm really glad too that I shortened the length.
 
 
And here is close up of the hem stitching on the skirt.


Believe it or not, this outfit took all…stinking…week!
I seriously underestimated working with this silky polyester fabric,
which had me scurrying frantically to finish up what I thought was going to be a simple project.

 All in all, I really like the way my outfit turned out,
and I’m more than thrilled that I still have my sanity intact!
 
Now, head on over to The Renegade Seamstress
 
The overall winner and final placement of all four remaining
women will be determined by this week's scores and votes,
which will be announcement this Saturday!
Related Posts Plugin for WordPress, Blogger...