Showing posts with label crochet. Show all posts

Tuesday, September 9, 2014

Basket Weave Pattern Crochet Baby Afghan

Before I knew how to sew,
I spent most of my crafty energies crocheting,
and often I had orders from family to crochet baby blankets.


This is one of the patterns I liked to turn to,
granted, this pattern will use more yarn than a blanket of the same size in a different pattern,
but you can't beat the dense, thick, lush feel of this blanket.

 I don't have this pattern written down row for row,
but it is a repeating pattern so it is really easy to figure out.


Worked in one piece,
the squares are created by working front post double crochet (FpDc) 
and back post double crochet (BpDc).
A post stitch is done by crocheting around the post
(with the post either in front or in back of your hook)
instead of working in the top stitches as you normally would.

Here is a great video that explains this technique.


So all you are doing is a double crochet (dc) either in front or in back of the post.

This pattern is:
10 squares across x 12 squares high,
each square is 15 dc across, and 10dc rows high.

So essentially, just dc in the front and back of the posts to create the look of squares,
and once your squares are 12 rows high,
you change your order of front and back posting to change the pattern.

Once you start working this pattern you won't need directions or row by row run through!
Buuuuttt, just to help you along, here is a rough pattern.

~~~~~~~~

 Basket Weave Baby Afghan Pattern (rough) 

Hook: H
Yarn: any type, I use soft, baby yarn
1.5 lbs of yarn (4 normal 8 oz skeins, you may not use all 4)
1 skein for trim, in contrasting, complimentary color (optional)   


  Starting chain 153 (10 squares across x 15 dc in each square + 3ch for beginning dc).


Row 1: Dc across, ch3, turn
Row 2: (It doesn't matter if you start with the FpDc or the BpDc one this first row- just pick one)
*FpDc in next 15 dc, BpDc in next 15dc* repeat to end of row. Ch3, turn

(I suggest keeping a row marker at the beginning  row of each square,
this makes it easier to know when to switch.)

Row 3: *BpDc in first 15 st (should be on top of BpDc from previous row), FpDc in next 15 st (also should be on top of FpDc from previous row)* repeat to end of row. Ch 3, turn

*When you turn the work your pattern is flipping, you are not actually
alternating rows, though it looks like it on paper.

Repeat rows 2-3 until your square is 12 rows high.
Now change so you are back posting on top of the front post row of 15dc, and front posting on the back post 15dc row. This creates the changing of the squares.
Mark the beginning of this row, the change in the pattern for your next square.

Repeat like rows 2-3 to complete your next row of squares.
Continue working in this manner.
You will see the pattern clearly, and you will know when to change!
End off.


Edging
The edging is a half double crochet (hdc) shell and post pattern


Start in corner along the smaller, top edge of blanket.
ch2 (counts as hdc) and 1 hdc in corner, *ch 1, skip two st, 2 hdc in space between dc,*
repeat until you reach the other corner.
In corner, 2hdc, ch1, 2hdc, ch 1, hdc around each dc stitch down the side- do not chain in between.
When you reach the bottom corner, do as other corner (2hdc, ch1, 2hdc)
 return to ch 1, sk two, 2 hdc along the bottom edge.
Do next corner same as last, repeat 1 hdc around each dc up the next side
When you reach the corner you started in,
do 2 hdc, ch1 then connect to top stitch of starting ch 2.
Finish off, weave in ends securely.


This is an indulgent pattern...because the way the stitches are worked, your rows aren't quite as tall, thus your yarn doesn't go quite as far as other patterns might, but I absolutely love the outcome! 
It is so beautiful both in texture, weight and appearance.

How about you,
do you sacrifice practicality for the sake of appearance and overall outcome
in your crafting projects?

Do these 'cooking without measuring' type of crochet directions make sense,
or are you a strict row by row type of crocheter?

Sunday, September 7, 2014

More Mer...Maids and Men

I never imagined when I shared my first
crocheted mermaid doll that it would be so well received, by cyber and real life friends alike!

It wasn't long after making my first doll that I received an order from a friend
for eight more!!

Here is what I came up with...


 I had fun coming up with different hair and fin combinations...not to mention eye color!


AND
 of course, who doesn't want a little romance...mermaids are no exception,
so a merman order soon followed.


Here is my hunky mer of a man!
 

You can barely see it, but he has a cock eyed grin.
 

As with the ladies, I find the hair and facial details the most challenging part,
but I think he turned out lookin' pretty good.
 

"Look at you, still all muscly and everything."

As it goes with people mers in love, 
I expect there to be a couple of merbabies by Christmas. ;)


For those of you who have asked about this pattern,
after making nine of the ladies, I have a pretty good working pattern down,
and with a little more work I can probably do the same with the merman.
I plan to offer these patterns for sale on Etsy in the future...but right now, there is no definite date. 
I will be sure to announce it here on the blog when I do though!

Saturday, January 18, 2014

DIY Crochet Hook Clutch

I crochet.
Didn't know that?
Well, I haven't showcased many of my projects yet on this blog,
but I have been crocheting since about 10 years of age,
and have crafted a myriad of projects.

I have my mother to thank for teaching me the craft,
and this Christmas I wanted to give something back to her,
which is why I decided to sew her a clutch case for her various crochet hooks!
This was one of the projects I was really excited about making,
but couldn't share with you back in November.

Through, where else, but Pinterest,
I found this wonderful tutorial from  Little Birdie Secrets.
All the measurements are there for you,
even a breakdown of pocket spacing for each hook size.

My Changes:
-I did make my pocket size for G and H a mite smaller,
going just under 1/2 inch.

-I made my clutch a tri-fold.
 I liked the size better and felt it helped to cocoon the hooks in more securely.
This does affect the placement of the button,
so bear that in mind when considering which version you want to make.


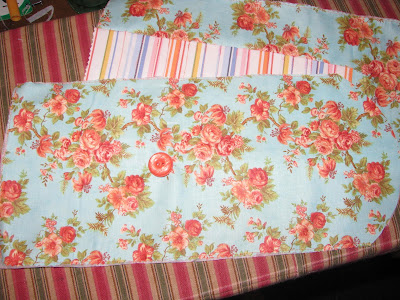
I used leftovers fabric from this project and a multi-colored striped shirt in my refashion pile
to craft my version of this hook case.


See those lovely colors?
I knew this would partner well with the coral and robin's -egg- blue of this gorgeous floral print.
It lends a bit of whimsicality, don't you think?


The stripped fabric became the sheaths for the hooks.
Following along with the instructions,
it came together very nicely.


You can see here that my button placement is different than the original.
Just fold your case over as many times as you would like, in this 'case' (sorry), 
I folded mine over twice, then the rounded part folds downward. 
How you fold it will determine where the button and closure fall.


Doesn't this button match perfectly?!
Would you believe it was the original button from the huge coral blazer I refashioned?


It is hard to tell in this picture,
but it just so happened that many of the lines I stitched to create
the hook pockets correlated with the pattern stripes!
At any rate, they made excellent guides for a straight stitch.


Here it is all finished!

The biggest problem I had?
Sewing this darling up without mom knowing!
My sewing area is in the middle of the house, a high traffic area,
so there is no hiding what you are making...unless..yes...that was it!
I would make it in one morning while mom was away at Bible study!!
It was perfect...she would never know...I'd clean up every trace of evidence...
there wouldn't be a single thread on the floor...the perfect crime surprise...mwahaha!!!

No joke. 
That's just how I felt.
Like some mad scientist whipping up an end of the world concoction in his lab,
I was giddy with delight that I pulled it off, a complete and utter surprise!
"I've done it!! I've created a masterpiece!"


It still gives me thrills just thinking about it.

And she was...
completely surprised.

Thursday, October 3, 2013

Tea Dying

Tea dying.
What a novel idea.

Have you seen the Pins too?
I didn't know this was possible, but it makes perfect sense.

So I decided to give it a go.


Instead of using the usual brown tea, I found the most vibrant tea in our cupboard!
This beautiful, deep red tea was perfect for what I had in mind!
 
I started with a slightly larger than cereal bowl sized bowl,
boiled some water, then added two bags of
Celestial Seasoning's Raspberry Zinger tea (one of our favorites).
 
For this experiment, I wanted to dye two doilies I had recently finished.
After dunking the tea bags in the water for a bit, I took them out.
I placed one doily in the tea, put a tea bag on top of it,
put in the second doily, and the other tea bag on top of that.
A little sandwich, if you will, of doily and tea bags.
My reasoning was that this might help distribute the color evenly between the two doilies.


And then I forgot about them....for most of the day.
I stirred and squished them around every now and then
when I came through the kitchen.
 
At the end of the day, I took them out, rinsed them lightly,
then laid them out neatly to dry.


This is how they turned out!
I have laid them next to un-dyed doilies for comparison.


This was actually the hue I was hoping for!
I was pleased.
 
A little note, the color does fade more after they sit for several days,
which was a little disappointing, but not entirely unexpected.
 
All in all, I think this is a fun, economical way to throw in some color!
What do you think?
Have you done tea dying before?


Saturday, June 22, 2013

Little Mermaid Crochet Doll

My little sister turned 10 years old this spring, and I wanted to make something she would really like.
We both share a love for all things mermaid as well as Disney.
I decided to head in that direction and crochet her a mermaid doll.
I searched high and low for a mermaid pattern but didn't like any of them.
They were all fat and pudgy with misshapen fins.
Not what a mermaid is supposed to look like.
I did find this picture, which is an old magazine pattern that is pretty expensive
to get ahold of.


I loved the idea of the fin going all the up instead of the separate shell bra.
Borrowing a tiny little bit from this pattern for the fins (I changed it a lot, it was just the base),
and using the directions from this pattern for the arms, I had a good start.
As for the rest...I made it up as I went along!
 
 
Front body
Back side of body


Fins


Fins attached and upper body and head worked onto fin.


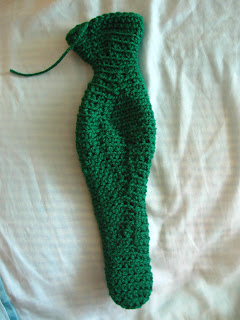
Once I had finished the fin/green body,
I stuffed it as best as I could.
Next I changed colors and began working the upper body and on into the head.
Before closing off the head, I stuffed the rest.
 
From there I stopped taking pictures as I went (sorry!).
 
Here is the gist...
I crocheted two arms, ran a half folded over pipe cleaner through them,
then attached them to the body.
 
For the hair...well...I really faked and fumbled my way through it.
I made lots of curly little twisted worm deal-ios and attached them...
then did a bunch of other stuff that surprisingly turned out looking decent.


Next, I used embroidery thread to add the eyes and lips.


To finish it off I made a small necklace and sewed some clear sequins all over the body.
And tada!
A mermaid doll!


Maybe someday I will sit down, try to recreate this and write out the pattern.
But for now, I'm just pleased that I made it work.


Friday, May 17, 2013

Italian, Corded or Reverse Single Crochet Edge Pattern

This is a supper simple stitch pattern, though it may feel strange at first.
 
To make this edge, do one row of single crochet all the way around your project.
Next, without turning , chain 1, single crochet in each stitch around, working from left to right.
 
You are making a single crochet stitch, only backwards, in the reverse direction
you normally do your work.
 
Here is a great little video tut from Youtube to help you out.


Enjoy!


Tuesday, May 14, 2013

Petal Square Motif Crochet Pattern

Petal Square


ss- slip stitch
sc- single crochet
dc- double crochet
st- stitch
 
Worked in size H hook
 
Ch 8. Join with ss to form circle
 
Round 1: Ch 8 (4dc. ch 5) 3 times in circle. 3dc in circle. Ss in 3rd st of ch8.
(Equals 4 sets of 4dc- looks like a cross)
 
Round 2: Ch 1. *6 sc in ch 5 space. 1sc in each dc. Repeat from * to end of round. Ss in first sc.
 
Round 3: Ch2. 1dc in each of next 3 sts. Ch5. *1dc in each of next 10 sts. Ch5. Repeat from * twice. 1dc in each of last 6 sts. Ss in top of Ch2.
(Basically- there should be 2 dc, ch 5, 2dc in each corner/space; and 6dc on each straight-away
Equalling 10dc, corner space)
 
Round 4: Ch1. 1sc in each st and 6sc in each space to end of round. Ss in first sc.
 
Round 5: Ch2. 1dc in each of next 4 sts. *Ch3. 1dc in each of next 16 sts. Repeat from * twice. Ch3. 1dc in each of next 11 sts. Ss in Ch2.  Fasten off.
(Simplified- There should be 3dc, ch3, 3dc in each corner/space and 10dc on each straight-away
Equalling 16dc across, corner space)
 
 
Excerpt from A Complete Guide to Crochet Stitches by Mary M. Dawson, 1972


Saturday, May 11, 2013

A Wedding Gift Afghan: How it Was Made

In my last post I shared some about an afghan I made for a friend's wedding gift.
 
When I started this project, I had a specific image in mind I wanted to create.
Researching different methods and patterns, I got some good ideas, but didn't find exactly what I was looking for so I ended up putting various elements together.
 
I thought I would share them with you today and maybe save you some time and hassle yourself.


Pinned Image
 
My main inspiration came from this little beauty, you can find the link my visiting my Pinterest board.
I loved the idea of bright colors with the white joining.


Pinned Image
 
 
In light of the time crunch I was under, I wanted to keep the squares simple
and work them in one color, like in the above picture.
 
 
Pinned Image
 
Being a person of order, I knew from the start  I wanted my squares to
be arranged in an orderly fashion, not just helter skelter.
This basket weave pattern arranged in a quilted design got me started on the right track!
 
 
Sadly, I knew I wouldn't have enough squares of each color to be able to make that pattern
work for me.
(Another day, lovely...although your color scheme MUST be changed.)
 
 
I spent a good while scouring the web for a pattern that might work, looking anywhere
for that final piece of inspiration.
 
All the time, the answer was right under my nose...no really.
 
Looking down at the quilt on my bed I saw what I was looking for!


This quilt was made by my Grandma H., and features a radiating diamond pattern, the one she uses for all of her beautiful quilts.
It was the perfect pattern for my afghan!
 
 
After getting all the design elements in place, I got down to the mechanics of the thing.
 
I mentioned I was under a serious time constraint, right?
 
That being so, I didn't want to do the traditional granny square pattern, and most certainly didn't have time to change the colors each row.
 
Something quick, simple yet attractive was in order.
 
In moments like these I turn to my absolute favorite crochet resource.
 
This book...


Get. This. Book.
 
I'm serious, this book is invaluable, I don't know where I would be without it-- it isn't one of those books filled with uses projects you won't actually make.
 
No, this book is full of many great stitch patterns, motifs, shells, edgings, lattice and lacy patterns,
variations and combinations of simple stitches, and even Tunisian/afghan crochet.
 
Each stitch/pattern is accompanied by a clear, black and white picture so you know exactly what it looks like.
 
 
I used the Petal Square motif from this book, a pattern I'll share with you soon.
It looks like this.


After making tons of those (my afghan was 9x13= 117 squares) I laid them out on a clean twin sheet
and began to create the diamond pattern.
 
It did take some playing around with colors and combinations to complete the rows and complement each other.


Some of the rows are done in more than one color, but even in those I was able to keep a pattern.
I always tried to keep the points of the each row the same color- notice especially the pink and light blue/purple rows.
 
 
When I got to the outter corners, I had to get creative, but there is still a pattern!
 
In one bottom corner I did two pinks and a green tip on the left; on the right side was two yellow squares with a purple tip.
 
On the top I reversed the pattern- two greens with a pink tip; two purples with a yellow tip, only they were in opposite corners to their cousins on the bottom, I liked that design best.


Can you see what I'm talking about?


Be creative!
I used what I had and made it beautiful!

When it came time to connect all the squares, I also improvised a wee bit.
Using the method in this video, I made a change by working a Half Double Crochet instead of Double.


Joining Motifs with DC


Also, my squares had a solid outside edge, so I started in the corner like she shows of the bottom square, hdc in corner of top square, but then I skipped the next st of the bottom sqaure, hdc, sk, hdc etc.-- essentially going in every other stitch on both top and bottomw squares.
I ended in the corner of the bottom square, then hdc in the corner of the next square on the top.
Hdc in the corner of the bottom square and you are restarting the sequence.


 When I joined, I worked in the BACK LOOP only, as you can see in this picture.
I experimented both ways and liked this route best because the squares stood up more
creating the 'quilted' look I was aiming for.


I worked with all of the squares right side up laid out like this.
Each row is worked length wise and ended off at the end.


I used the same method when connecting them width wise.


For the edging I refered again to the Complete Guide to Crochet Stitches,
and used what they refer to as the Corded or Italian Edge, also called Reverse Single Crochet.
 
I'll share those instructions with you in a later post as well.


Be sure to alwasy work on the right side of your project.
This creates a front and back to your afghan.


The front is smooth with the hdc stitches cleary visible,
while the back has a raised 'seem' that runs down each row.


 So, there you have it! That is basically a crash course pattern for this afghan.
If you know your way around crochet, it should be pretty easy to duplicate.


All work was done with a size H hook.


TIPS:
Use yarn of the same size and weight
I was working with what I had, and some of my yarn was a different weight and feel than the rest. The squares turned out a little larger, resulting in some pull when I joined them all together. Not the end of the world, but it is something to be aware of.
 
Sew in all of the ends on your squares before joining
It is easier done sooner than later, trust me. Securing the ends by weaving and sewing them down now might seem like a time consuming hassle, I HATE weaving in ends, but it will make your project much more secure and clean looking. 

 
 Happy hooking! 
Related Posts Plugin for WordPress, Blogger...