Saturday, August 31, 2013

Looking Back: August

Can you believe the last official month of summer is over?!
Next month will be the start of fall!
At least that is what is they teach you in school...here in Texas the months don't
exactly follow the typical seasonal changes.
 
At any rate, we are starting a new month, and in my experience,
these last few months of the year go by faster than all the rest...
kind of like the last quarter of gas in your car goes faster than the first.
 
August was full and eventful for myself and my family,
but sadly we don't have many pictures to show for it! :)

What I do have are some cute pictures of a couple Horny Toads, or Horned Lizards,  we happened upon in our outdoor wanderings.
We have been seeing a lot more of them as of late.

For the last couple of weeks, I have been helping Dad with another big job
and we have been working on a ranch way out in the rugged boonies.
That is where we came across this little guy! 


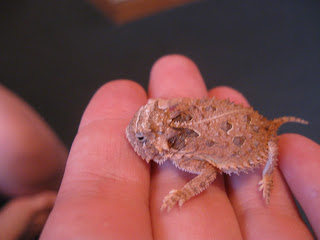
It's a baby Horny Toad!
 So tiny!
I have never seen one this small before!
His body, not including the protruding legs and head,
was probably the size of a 25 cent piece!


Here he is in my little brother's hand.
If you stroke their soft underbellies and neck, they will fall right to sleep.
This little guy however didn't like getting his belly rubbed...but he did like getting his head pat.


Isn't he cute?!
He calmed right down after being stroked and petted a bit... just sit there and fall asleep.


Now here are some pictures of what a full grown Horny Toad looks like!


See how bit this fella is?
And he is even in Dad's hands this time!

The big ones look a little more intimidating,
not quite so cute and cuddly,
and their spikes are more firm.
But they aren't really sharp or dangerous.


Their underbellies are soft, just like a toad's.
This one was really fat!
When upset, they puff up...so obviously, he must have been a bit upset.


Horny Toads are endangered, so it is illegal to keep them as pets.
So after their brief, glimmering moment of fame,
we put both our spiky friends back where we found them.
Though I have to admit, I was really tempted to keep Baby!
 
I hope you all had a wonderful August!

Monday, August 26, 2013

{Refashion} Blue Floral Tunic Vest

Good day, y'all!
I have another finished project to show you.
In all honesty, I have had this one done and hanging in my closet for over a month,
but I have been so busy and I had a hay of a time getting the 'after' pictures done, sooo, yeah...:)
 
I'm not sure if this should really be classified as a 'refashion',
since really, I'm only making a few little fitting changes to it.
Hmmm, any suggestions as to what I should title that kind of a post?
 I'd love to hear what you think.
 
Anyway, here is what I started with...
 

Before


I found this lovely sheer floral vest at the thrift store a couple months back.
Originally, I thought I would chop off some of the length and turn it into a sleeveless top,
but I wore it once just for kicks and fell in love.
 
 
It just needed a few little changes.
These before shots don't show it well, but there were only three buttons down the front which left a big flappy part down the middle...I really felt there needed to be a fourth button.
Secondly, this vest was a little large, so I needed to take it in, including the shoulders which were hanging off a bit.


To fix the shoulders, I added some pretty pleats.


And to fix the extra bulk, I made a little gather in the back and sewed it together with a zig-zag stitch.
The stitches are visible, which isn't usually what you want, but I didn't mind.

Probably the hardest part was making the fourth button hole,
this was my first experience making a button hole, so it was interesting.
After making the hole, I replaced all the buttons so they would match.


It amazes me how just a few little tweaks can make such a difference,
especially in the shoulders. I never gave much thought to how the shoulders fit on my clothes before I started sewing, but now I see the difference a good fit makes.
 
I liked it before, but now I love this light, feminine vest...it is a perfect fit.

Have a great day!

Thursday, August 22, 2013

More Thrifted Treasures

So, along with a wonderful tea party, chicks flicks and ice cream,
guess what else my sister, Nana, and I did last week?
 
We went to the thrift store.
I know, I know.
I'm kind of addicted.
 
But in my defense, I was going to look for some things specifically,
namely, some pretty fabric for future sewing projects.
 
Here is what I found!


I found three good chunks of lengthy fabric, including a gorgeous deep plaid!!
I love plaids...especially rich, jewel tones.


I've been wanting to try my hand at making a fabric belt,
and this pretty metal buckle will help me with that.
 
There were several bins full of dusty, sewing patterns hidden on a bottom shelf,
but my sniffles and cramping calves paid off.


Look at this cute pattern!
For a while now, I've been wanting to make a jumper, like the blue one depicted on this pattern.
I love the full skirts and huge pockets. With the aid of this pattern, I have a winter project in mind, we'll see what happens with that!


Here is another versatile pattern, good for making camis, and those little jackets are cute too.


The option I'm most interested is, is that light, cute cinch waisted jacket.
How cute would that be as a cover-up for a strappy sundress?
Especially with lace and a cute ribbon tie like they show.


This will be a great go to pattern for nice shirts,
I love the short sleeve top with the cute lightly puffed sleeves.


This. This. This is the pattern I am most excited about!!
This is a wrap around apron!
It could even be worn as a wrap around dress, apparently.
How great is that?!


 After this summer, I decided I wanted a full length apron cover up that I can easily put on to keep my clothes clean when I step out to get eggs, pick stuff from the garden etc. free from the worry of getting my clothes dirty or snagged on something.
I'm excited about this one!
 
So, there you have it.
Are you as excited about the apron as I am?
Or did you like one of the other patterns instead?


Monday, August 19, 2013

In the Works...

Before I left to stay with Nana for almost two weeks,
I had just barely started a new sewing project.
There isn't much to show yet, and I have a busy week ahead of me working with dad, so I'm not sure when it will be finished, but I'm really excited about this one!
A mash up of two worlds, this project combines the use of sewing patterns and refashioned leftovers.
 
I'll give you a little preview and show you the pattern I'm working with...


This darling vintage pattern, loaned to me by my dear friend Atlanta,
includes pieces for the skirt as well as the adorable vest they term a weskit.
 
I'm so excited! I sure hope it turns out as great as I'm expecting.
And, as to which one I am making, I'll just have to leave you guessing. :)

Friday, August 16, 2013

Four Chicks and a Rooster Tea Party

Hello all!
 
If things have seemed a little quiet around here lately, it has been for good reason.
I, along with my little sister,  have been away from home (and consequently my sewing machine) for the past 12 days staying with Nana while Papa went on an out of state trip.
 
Nana didn't want to be alone for all that time, so we went to keep her company.
There were lots of chick flicks and ice cream had by all.
To earn our keep, we helped Nana with several different tasks and organizing jobs.
 
Our last night there, my mom and little brother joined us, and, in keeping with one of Nana's long standing special occasion traditions, we had a tea party.


My little sister and brother showing off their tea cups.


The table setting...


Wonderful Triple Berry Rhubarb pie!!
And aren't those plates precious?
 
 
Nana has a variety of tea cups, so we all got to pick our own!
This is such a fun idea, one I've decided I am going to implement in my own home.


My little sister picked out this sweet pink rose set.


Nana chose this cheery yellow cup and saucer with an oriental flare to it.


Mom and I both chose this darling set with blue flowers that I think might be forget-me-nots.


And my little brother found a cute mini set that was just his size. 


Nana pulled out her cute little serving dishes and tea pot,
along with gorgeous saucer for our used tea bags.


It was a lovely time together, each enjoying their special setting and a varieties of yummy tea
to accompany the wonderful pie.
We even threw in a few British accents. :)


Aren't self-timer cameras great?
We were able to get a picture of the whole assembly, which Nana rightly dubbed,
four chicks and a rooster.


Monday, August 12, 2013

Fix It: Too Low Neckline

It's a common problem.
You find an adorable shirt or dress,
but the neckline is too low.

Sometimes you can slip a cami on underneath, or add a modesty panel.
But there is a quick little fix I've found that works well with pieces that have
straps...like tank tops or strappy sun dresses.

All I did was measure the amount of strap that I wanted to take up,
folded it over itself in the back, close to where the strap connects to the dress, then sew over it.


 See what I mean? You pinch together the excess strap, right sides together, then sew across it.
Now next snip off that extra little loop of a strap, and your are done.


This is what the back (wrong side) of the strap looks like after I cut off the excess.

I did this with two dresses and one tank top...


....it worked great for me!


Be sure to try on your top with the straps pinned up before you sew it.
Sometimes, the straps are long enough that you can do this without tampering how the rest of the garment fits, but with some shirts it will pull the arm holes up too far and make them too tight and uncomfortable. 
Be sure this isn't the case with your piece!

Simple, but a good, quick little fix.

Thursday, August 8, 2013

Oatmeal Raisin Cookies, Gluten Free Option

 It happened.

I was suddenly struck with one of those irrepressible food cravings,
you know the kind...
 something yummy gets fixated in your head and your just can't live happily until you've had some.

For two weeks, my goodie fixation was Oatmeal Raisin cookies.
It wasn't as if they were my favorite cookie, and it had been ages since I had any, but suddenly it became necessary for survival that I make myself a batch.

Sadly, my first attempt was a flop.
First...there wasn't a single raisin to be had in the entire house.
Oh well, chocolate chips seemed a good substitute, right?

Nope.
They tasted like chocolate chip cookies with a little more texture.
Good, yes.
But sorely disappointing when you were expecting something different.

So, after stocking up on raisins,
I tried again.

Ahh, the old fashioned, simple recipe I found in our go-to cookie cook book hit the spot!
I found it interesting when I read 'buttermilk' on the ingredient list.
But if there is one thing I've learned since moving down south,
 it is that all good things are made with buttermilk.

And what made it even better, with some slight tweaking I was able to make
a gluten free version so my dad could enjoy these treats as well!

 It was so yummy, I thought I would share it with you.


Farm-Style Oatmeal Cookies


*2 cups packed brown sugar
1 cup shortening
1/2 cup buttermilk
1 tsp vanilla
4 cups quick-cooking oats
**1 3/4 cups flour
1 tsp baking soda
3/4 tsp salt
***cinnamon

  • Heat oven to 375 degrees
  • Mix brown sugar, shortening, buttermilk, vanilla and cinnamon.
  • Stir in remaining ingredients.
  • Drop spoonfuls onto cookie sheet, flatten slightly.
  • Bake 10-12 minutes, until golden brown.
  • Let cool.
*I would recommend using less sugar, they were great, but a bit sweet for our taste.
 
**This is where I turned the recipe gluten free. I measured out 1 3/4 cups of quick oats and simply ran them through the food processor (a blender would work too) until they were a fine powder.
And there you have it, I made oat flour. It came out to be about the same ground up as whole, so the measurement you put into the food processor is pretty much what you will get out in flour.
 
 ***This recipe didn't call for cinnamon, but others I looked at did, so I just sprinkled some in. 
I didn't measure, so I would just say 'viewer discretion advised'. :) 


Yum, yum, yummy.

Now, the recipe says to bake these for about 10-12 minutes-- the key is until they are golden brown.
Mine were very crumbly, and I thought they weren't quite done, but once they cooled completely, they were perfect...soft and gooey. I made the mistake of cooking my next pan longer, and once they cooled they were hard, crunchy and even tasted a little different.
So less is best.

This recipe came from the Betty Crocker Cookie Cookbook, 1986 version


Enjoy!
Related Posts Plugin for WordPress, Blogger...