Week 3: Copycat
Ok you guys!
The next project challenge in the Refashion Runway series I'm doing was to create a copycat look.
The rules were simple: find a piece in stores, online, catalog, etc., and copy it as best you can!
After lots of looking, I found this...
After lots of looking, I found this...
 |
| Flare Peplum Top from Dillard's |
As soon as I saw this top, I knew it was going to be my copycat.
I had the perfect piece in my refashion bin that I was pretty sure I could transform.
And when I say 'transform', I mean it in the fullest sense of the word!
Have a look at these before pictures...
Before
My piece was an oddly draped stretchy cardigan-jacket thing.
I bought it years ago, but never liked it.
The front panels came to a point, which is why this piece popped into my mind when I saw those handkerchief points on the Dillard's top.
After lots of seam ripping, I had my cardigan completely deconstructed.
What you see here (l-r) are the sleeves, the back, and two of those odd shaped pieces that formed the front sides.
The back piece was going to be the back of the shirt.
I planned to use the sleeves and other parts to piece together princess seam front.
And those strange looking side pieces with the points? They would become the peplum ruffle.
Using a favorite, well fitted shirt of the same type material, I marked out how much I needed to take in the sides of the back piece.
I measured where I wanted the peplum to be attached, then cut off the extra length.
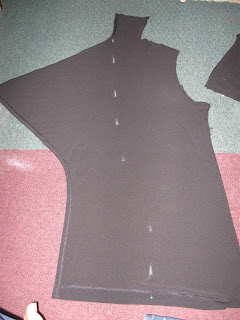
These were the pieces I worked with to create the front of the shirt.
It took a lot of experimenting, measuring and rearranging to figure out the best way to lay them out,
but I finally figured out how to accomplish what I wanted.
Taking two of the larger pieces, I traced the curve of the arm holes onto them and cut away that extra material. Then I attached them at the sides to my back piece and across the top to form the should straps.
Taking another smaller piece, I sewed it the exposed inner edges of the pieces I had just attached.
This formed the princess seams and created a square neckline.
This is what it looked like.
I added two deep darts in the back and two darts in the front along the princess seam until it fit snug.
It isn't shown in these pictures, but I later added a couple little tucks at the center of the square neckline to fix a little gaping problem I had.
Next, I measured how long I wanted my peplum to be,
then measured and cut accordingly from both of my front panel pieces.
I was left with two pieces like this.
I pinned them together in the back, making a sort of belt....
And I pinned them together in the front to another small rectangular piece.
I used the extra piece at the front because I wanted to space out the points a little more to better capture the look of my copycat inspiration.
Once I sewed those pieces together, I ruffled the band then attached it to the bottom of my top.
After that I did some top stitching and tinkering.
Then I was done!
Aaaaannndddd heeeerrree it is!!
After
Those lovely, fitting, darts in the back.
What the peplum ruffle looks like from behind.
See the little tucks I was talking about at the neckline?
They do the job nicely.
Peplum tops are hugely popular right now, but I've never been one to jump right on the band wagon...I always wait a while until something grows on me... or doesn't.
I'm glad I did this project, though I must admit I'm still not a peplum fan.
The idea is cute, but I don't find them very flattering to my body type.
That aside, I'm not gonna' lie, I'm pretty proud of my copycat!
To completely deconstruct my beginning piece
and come out with these end results was so rewarding!
Not to mention it feels pretty impressive to have pulled this off from scratch...no pattern!
Just the ideas in my head and the inspiration in front of me.
It was pretty challenging and a little scary!
Especially once I made the first cut...there is no going back from that point!
It makes me happy when what I see in my head forms itself into something I hold in my hands.
It doesn't always turn out perfect, but it is extremely rewarding!
Not a perfect copycat, but I think I like my version better.
What do you think?


Omg!!! You made it so wonderful. You are such an inspiration for me to sew more. I cant wait till the day I go to sewing course :)
ReplyDeleteI am so much agree that yours is better.
Blessing,
Delvalina
Way to go!! I love this one.
ReplyDeleteThanks, y'all! :)
ReplyDelete~Des~
Wow that is amazing. I dont think I could have pulled that one off.
ReplyDeleteThank you, Loree! :) It was more of a learning project than anything else- there are a few little issues with it, but it was the first major overhaul I had done!
Delete