Monday, December 30, 2013

Top 5 of 2013
Hits

 Hello my dear faithful-even-when-I-don't-post-for-a-month followers!

I don't know about you, but this past month was so busy
 that blog posts were the last thing I was worried about. 
I'll admit, I did worry about it a wee bit, but hey, the reality is I have a life, you have a life, 
and that life won't end if I don't post anything on my little blog.

Aside from being busy completing a large order of my mermaid crochet dolls, 
making some (though sadly not all) of these DIY Christmas gifts,
 I also dealt with an illness immediately following Thanksgiving 
that could have landed me in the hospital. 
I still have a few issues that I need to deal with, 
but I was able to get my body back up to relative health.

Anyway...
As things have settled down a bit,
I have been doing some catching up on my blog reading, another thing that didn't happen over the holidays, and I have been seeing the Top 5 of 2013 posts at several blogs I frequent.
It sounds like a fun idea, so I thought I would hop on the last passing wagon!

Here is my list for...

 Top 5 of 2013: Hits


http://crafting-a-rainbow.tumblr.com/post/70085318438/join-me-in-posting-your-top-5-lists-for-2013


5. Minty Teal Shirt Refashion


This was a pretty easy refashion, more of a fitting job, really, than an overhaul.
But with a few little fitting tweaks and by taking off the collar,
I completely changed the fit and style of this shirt.
It quickly became one of my favorite wardrobe pieces!

4. Bubble Hem Denim Maxi Skirt Refashion


Again,
this was a pretty simple refashion.
By combining a too-small pair of jeans and a hardly-worn skirt,
I created a fun maxi skirt that I absolutely fell in love with.
All of the extra width of the skirt was gathered at the front by using a box pleat,
and this created a flowing, draped effect at the front of the skirt.
This was in strong rotation during the warmer months of summer,
and I can't wait to pull it out next season!


3. Peplum Jacket Refashion


Those of you who followed me
during the Refashion Runway challenges will remember this jacket.
 I am super proud of how it turned out, and I love all of the little details...
lightly puffed sleeves, pin tucked seams in front and back, extra buttons
and lovely metallic and burgundy thread stitching detail.
Plus, as a budding seamstress, this held many firsts, including drafting
my own peplum pattern.


2. Medieval Costume


My first real refashion challenge this past year
came when one my younger brothers needed a medieval costume
as part of his camp counselor outfit for their weekly medieval banquet.
After a thrifting trip, we came up with just the right pieces
and I was able to make a shirt, vest, cape, hat, leg wraps,
 and even the cape clasp from thrifted items!
His outfit was a hit and I was more than thrilled with the final results.


And now, for my most favorite refashion and sewing project from this year...
I give you ...

1. The Jane Costume 


Also another project from the Refashion Runway Season 2,
this is for certain my crowning achievement of 2013!
In the midst of this project, I was under pressure and a bit stressed,
but looking back, I had lots of fun putting together the details and seeing things take shape.
The best part of course was seeing the finished costume and dressing up for a fun photo shoot.


And there you have it,
my top five hits from this past year!

When I take into account that I haven't yet been sewing for a complete year,
I am so excited and pleased to look back and track my progress.
I can't wait to see what this coming year has in store!

I would like to thank Gillian over at Crafting a Rainbow
for coming up this great year end review idea!

Thursday, December 26, 2013

Christmas Afterglow

I pray each and every one of you had a blessed and joyous Christmas season!


 As I write this post, I am basking the pleasant serenity and afterglow of Christmas.
Our lights still dance and flicker this evening, 
adding cheer and warmth to otherwise darkened windows and doorways.
My tummy is content with the pies of my recent labors, our plumpened refrigerator 
offers a reprieve from kitchen duties,
and that anxious excitement proceeding Christmas has matured into the
warm contentedness of seeing my loved ones smiling and grateful faces
in return for money and hours of work spent on their gifts.

It was a very good Christmas, 
and I'm most thankful for all I have, received and was able to give!

I have so much to share you with you in the weeks ahead,
but I still need a bit of time to recover from my oober busy month.
I thought I had better let you know I was still around!


Blessings and peace upon you all as we soon enter into a new year!

Wednesday, November 20, 2013

It's Coming, It's Coming!

Hello, friends!
I'm sorry things have been so quiet around here since the end of RR,
but I just have one thing to say to that.
Christmas is coming!!!
 
Do you know what this means?!
 
This means I have less than 34 days to make all my gifts,
AND fill an order for eight of my crocheted mermaid dolls!
On top of that, I've returned to serving as my dad's carpenter assistant,
so that makes for long days, which means even less time to make everything!
 
But don't worry,
I'm a chronic procrastinator (for evidence there is this post, and this post, AND this post).
but if there is one thing I've learned, it is that I work best with the panic of an impending deadline!
 
That means things will be kind of slow here on the blog for a season,
but I know you all have your own busy holidays to tackle,
so maybe one less post to read will be good for your schedule as well.
 
I would love to share with you my finished products,
but there are several people who read my blog that I will making things for,
so those will just have to wait until after Christmas.
 
Here are a few projects I intend to tackle that I can show you!(JOSIAH )Noodlehead: celebrate the boy tutorial: basic boys wallet
Isn't this darling?!
I have a little brother who needs one of these.
Whenever he wants to go out and spend his hard earned chore money,
he brings his entire, jangling money tin.
I think the little man needs a wallet of his own.
This great tutorial can be found here.
{ELAINE} LOVE this idea!!! 1. Google any silhouette 2. Print on colored paper  3. Cut them out  4. Place in frame  5. Voila!
Little sister. Pink princess cutouts, framed.
Need I say more?
denim clutch: Elisa?
Here is another project I'm considering recreating for my little sister.
There are no directions with this Pinterest link, but I think with some tinkering I can figure it out.
 
 
ASPEN- ELISA-- Lemon Salt Scrub: 5 tbsp. sea salt, 1 tbsp. olive oil, 1/2 lemon...{In comments, other added the zest of the lemon; vanilla; honey; sugar instead of salt etc.}
Homemade Lemon Salt Scrub.
All natural, easy to throw together, and a great pampering gift!
I plan to make several jars of these.
ELISSA- Make lipgloss from lipstick! #DIY
Along the same lines,
I found this pin on making your own lip gloss.
This would be a great stocking stuffer or part of a spa gift package for the ladies.
 
 
That's all I can share with you for now,
which is sad, because the projects I'm most excited about making I can't show you yet!
 
Isn't it wonderful that Christmas gives you an excuse to actually make
some of those amazing pins you been stockpiling?
 
Are you making your own gifts this season?
Where do get your inspiration and ideas?
I'd love to know!

Monday, November 11, 2013

What Goes Around...Vintage Trends

You would have to be living under a rock
to be oblivious to the fact that vintage and retro has come back into style.

Sites like Modcloth, Eshakti and others are teaming with
lots of lovely vintage inspired copycats, and I love it!

While some modern trends are obviously vintage throwbacks,
I have discovered several trends that I didn't know had their roots in vintage fashion!
Here are a few examples I came across.
 
 
Color blocking
{Amazing how styles and trends come back around...} Linda Darnell in 1940s tiered gypsy dress with colour blocking and ruched bodice
Here we see a 1940's tiered gypsy dress with color blocking.
I was pretty shocked to find out this was a vintage concept!


Belts 
1940's style belts
I'm sure you have all noticed belts that look like these, especially B and C.
This chart dates back to the 40's, I think.
 (Does it bother anyone else that the letters on that chart are all out of order?! Gahhh!)


Big Pockets
Vintage Pattern 1950s Pinup Rockabilly Dress by CaliforniaSenora1940s Pattern Bureau Mail Order 2161 Vintage by GreyDogVintage, $18.00
Big, exposed pockets are back in, and it hasn't been the first time they were popular, 
as seen in these 1940's patterns.


Peplums

Vintage patterns look a little like today tops!Advance 4487 Misses 1940s Blouse Pattern via Etsy.


Peplums....all the craze these days!
Perhaps the modern designers thrifted some 1940's patterns just like these and decided to bring them back? 'Cause they look just like the peplums you see all over today.


Here is another version of the peplum.
1940's Vintage Pattern  McCALL 6800  Gorgeous by shellmakeyouflip, $28.00
This looks a lot like the design I ended up with for my refashioned peplum jacket, doesn't it?!


Bubble Hem
Simplicity 3037 - no. 2 <3
This is a 50's pattern as far as I know.
This trend also made a resurgence in the 80's
and now it is back again.
I'm sorry.
I don't get this one.
It looks just as strange back then as it does today!


Lace Top/Sleeves
Vintage 50s Evening Cocktail Dress Pattern All around gathered four-gored skirt joined to bodice at princess waistline. Dart fitted bodice features scalloped edging with lace accents with cap sleeves.
This is a 1950's evening gown pattern, with the lace top and sleeves.
So classic. So beautiful.
This is style, not just fashion!
There is a reason this look is still around.


Pinafore

Vintage pattern for a pinafore like Dorothy'sVintage Fashion Library - Vintage 40s Girls Pinafore Jumper Dress Bishop Sleeve Blouse Sewing Pattern Vogue 2229 8
Pinafores are coming back in (and have made their way onto my 'need to make' list)
and while you may not see a whole lot like the two above styles, which date back to the 40's,
there are lots more like the style pictured below.
.
Isn't it cute?


What do you think about the resurgence of all the vintage looks?
Did you know these modern trends had vintage echoes?
Have you come across any other modern trends that you didn't realize
had vintage roots?

Thursday, November 7, 2013

Behind the 'Seams' of Refashion Runway, a Look Back

At the beginning of Refashion Runway,
I purposed to at least make it to the Peplum challenge.
But God gave me the continued grace and inspiration to far exceed those expectations!
 
  I was SO ecstatic when I first found out Beth from Renegade Seamstress
had selected me to be a part of the second season of Refashion Runway!
Little did I know I would make it to the final round and place Fourth Overall!

There wasn't a single week in this competition that I didn't do something I hadn't done before.
As a result, I feel my skills have more than doubled since I first started.
 
Here is a little look back at each one of the six challenges,
and a little 'behind the scenes' info you didn't get in the previous blog posts.


I was running off of pure adrenaline for this project!
On Friday I got word that I had been accepted into the contest, and my project was done by Sunday.
I already had a piece on hand to refashion, which made it that much quicker.
And honestly, it was not cool enough to be wearing these boots...I was baking!
This is Texas after all.
 
 
Week 2, Emerald Green


This one took me the longest out of all six projects to complete.
I just couldn't get a vision for this piece.
I started working on it still in the first week of competition, and I didn't get it finished
until the following Wednesday, so about nine days!
A lot of that time, it just sat there and I wondered what to do with it.
It is the piece I least like of all my RR projects.
This one came together through prayer and encouragement.
I dubbed it The Green Monster.


This was only the second peplum I've made,
and really, I was NOT impressed with the first one.
But it gave me a clear vision on what I DIDN'T like about peplums,
so I was able to change up the look for this RR project and up with something I did like.
This was a pretty smooth project, I didn't have any bumps or setbacks with this one.
As far as trying new things went, this one probably ranked up at the top.
This was really the first time I had drafted a pattern before.
I also had never sewn a button hole the right way with my machine,
AND I had never used bias tape to finish off inside seams (similar to a Hong Kong seam).
When it was finished, I felt pretty proud, it was one of the most classy pieces I've made so far.
And it was in one of my favorite colors.


This one scared me.
At the onset of the competition, I knew this one would be a biggy!
I tried to focus on one week at a time, not thinking ahead until I was finished with the present job.
But this one kept sneaking into my thoughts.
Honestly, I wasn't sure that I would make it to this round when I began the competition,
so it required a special thrift store trip to find a leather piece to work with.
If the Emerald challenge was the hardest inspirationally, the leather one was the hardest technically.
It nearly got the better of me, but I told myself that if others could sew on leather, so could I!
It took a lot of research and some special tricks, but in the end I got it.


Coming off the leather project,
 I was going into the costume challenge with less than a full tank of emotional energy.
I had a hard time deciding on what I wanted to make,
and when I made the first of four thrift store stops, I had three different projects in my head.
I actually broke down into tears at Goodwill after more than an hour with still no clear direction.
I was still buying pieces on Monday, just four days before it was due!
 
Despite the bumpy start, I was able to settle on an idea, find what I needed, and get the project done.
There were more tears involved when I thought I had broken a zipper after three tries to get it sewn in, and there was more than once that I had to ask God for help. But it got done!
Up to this point, this was the latest I had worked into the week to complete my project,
finishing up on Thursday night!
I was still stressed though because we were supposed to get a bunch of rain the next day,
and I was worried about getting the pictures done.
As it turns out, the pictures I was most worried about turned out to be the most fun I had taking pictures! We got up early and had a great time freezing our hands off in the chilly dampness for a great shoot!
God is funny that way, isn't He?


Putting all niceties aside, this was kind of like my week of hell.
I had pushed long and hard with my costume project, and by this point, I was pretty much exhausted.
I got started late in the week (Tuesday, four days before deadline) because I was so worn out.
When I finally set myself to the task, I realized I had picked a very difficult fabric to work with.
What I wanted to do seemed pretty straight forward,
but the fabric made it three times harder and five times longer to get done.
The entire week I took two steps forward, one step back.
There were lots of tears. Lots of chocolate. And LOTS of support from my family.
But this week was honestly fueled by prayer and the shear grace of God.
I probably prayed hourly asking for clarity of mind
(I was making so many uncharacteristic mistakes), strength and support.
There was more than one day I was ready to give up and I seriously doubted
having a completed project to submit by the deadline.
On top of all that, I was getting sick with a cold my last two days of sewing.
But it happened.
I actually finished and God even gave me a wave of strength to cross over the finish line with a smile to show in the 'after' photos.
This top was pretty much my miracle piece!
 

 Finally, finally, I was finished with it.
Completely finished. No more projects to submit.
I had made it through the complete season of Refashion Runway!
 
Honestly, it didn't matter a whit what place I got, the real accomplishment was that
I had given my best, conquered every challenge and held my own amongst the company of
some extraordinarily talented women, all of whom had been doing this a lot longer than me!
 
And on top of that,
I met all of you!
 
Thank you to everyone who left comments, voted, and generally encouraged me each week!
 
Honestly, without my supportive family
and my very talented, patient brother who took all of the amazing photos,
AND without everyone's encouragement and comments
I would not have been able to make it as far as I did.

So here is to a very successful and unforgettable second season of Refashion Runway.
We did it, y'all!


Thursday, October 31, 2013

Looking Back: October

When I look at back on October,
one very distinct theme comes to the surface...
Refashion Runway.
 
Seriously,
it completely enveloped my life!
I know it sounds strange, but I celebrated being 'free' by cleaning my room,
which was in complete and utter disarray after being so long neglected in favor of the sewing room.
 
And I didn't just clean, I cleaned.
Changed the bedding,
washed the curtains,
washed my mosquito netting canopy, (I have an East Indian themed room)
vacuumed cobwebs (I don't celebrate Halloween, remember...),
and did the laundry.
 
It was wonderful.
 
So really, not much else happened to look back on this month.
But here are a few shots that didn't make it into some of my refashion posts.
 

First, here are some great, creative pictures that my photographer took.
 My photographer: "Ok, we got the outfit pictures done, now we can have some fun!"

We took these last ones in an old barn.
He hoisted himself up onto the second level (there were no stairs)
and took these shots through a crack in the floor.


I love this one.
The fact that it is bigger than the other pictures doesn't give that away, dose it? ;)


And these he took from the same upper level looking down through a window.


Now for some funny faces...


 Oh yeah, and these.


We found a pile of broken glass...
and it gave me a brilliant idea.


Do you see it?


And then there was a peep hole in the wall.

 
So we did this.


And last but not least,
this little gem.


Imagine standing on one heeled foot, in soggy ground
(quite soggy in fact, we had a flood earlier that week.
No joke...12 inches in the course of a few hours...main street was a river...
we made the news...three times...a flood!)
....where was I?
Oh yes.
Imagine balancing on one high heeled foot on less than stable ground,
sticking your other foot out in front of you, with a bunch of extra weight on your posterior.
Needless to say, I lost my balance...and my wonderful photographer caught it all.
No need to worry, I didn't fall on my bum and muddy my beautiful dress,
luckily the bench was right behind me and I was able to light upon it with one hand and steady myself.
 
So there you have it!
Goodbye October, hello November!
 
 
(I would like to thank Jen over at Diary of a MadMama for inspiring me with
her hilarious GIF's (like this one) and telling me how I could make my own!
Thanks, Jen!)

Sunday, October 27, 2013

Refashion Runway 2: Winter White

It is hard to believe this is the last week of Refashion Runway,
or as my family has dubbed it, ‘Runaway’, challenge!
 It is true, during this competition it was easy to let an idea runaway with me!
 
And that was certainly the case with this week’s Winter White project.
Let’s just say, I almost bit off more than I could chew and nearly chocked!
As a pretty new sewist (sewer…? seamstress…?),
I had never worked with silky fabrics before…until this week when I picked up
a huge blue top and a lovely cream blouse which was busting buttons at the bosom.
 I also had a 100% wool pleated skirt which I planned to spice up.


Just a heads up,
this was a very difficult project for me, I was pretty exhausted from pushing so hard last week,
and to top it off, I was fighting off a little cold/allergies.
Translated, this means there aren't very many process pictures.
I was rushing against time and really just wanted to get it done!
Plus I was making it up as I went along!
Not to mention that everything that could possibly go wrong, did.
 
 
I had a vision for a two toned sort of illusion top,
 so I set to work tearing apart my shirts.


One of the shoulders was open, so I took off the buttons...


and the tie collar...


and the bottom hem, which had a small strip of elastic at one side,
and more buttons on the other.


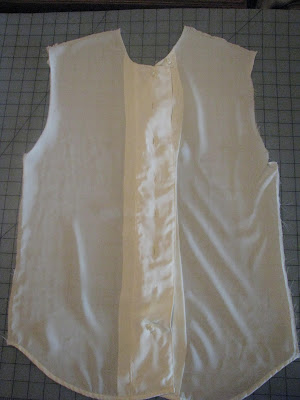
Then I removed the sleeves and collar from the cream shirt.


And separated the front from the back.


Some experimenting followed, resulting in a curvy silhouette pattern piece.
I folded my shirt piece in half, laid the pattern on the fold
and cut along the outside curved edge.


After cutting, this is what I had.


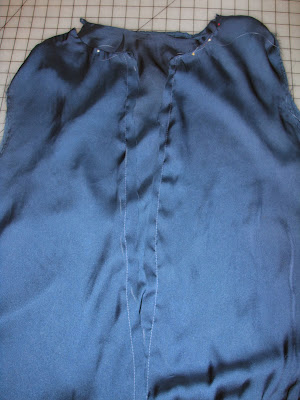
Returning to my blue top, I sliced it up the middle.
This shirt was made with two layers,
 so I basted them along the cut edges in an attempt to try and keep things all together.


I know there was some math and figuring involved at this point,
but honestly, it is all a blur.
I basically laid the cream piece over one side of the blue top...


...then traced the line where I wanted to connect it.


This material was fray ca-raaazy! This meant I needed to do French seams on everything.
So, I pinned my pieces together, with the seam on the outside.


After sewing that first seam, trimming the edge,
then folding over and sewing again, this is what one completed side looked this.
 
This basic process was repeated for the other side.


At this point, I was still working with a very large shirt,
so I pinned on the sleeves (which fit) so I could see where they ended.
This gave me the guideline for how much I needed to take in at the sides.


Even after taking in the sides,
there was still a lot of extra bulk in the back on account of the gathered neckline.
I resolved this by adding a series of pleats in the small of the back.


I also pinned and sewed the shoulders together.


This made the neckline in the front a little too high,
so I measured, chopped some off,
then covered it with bias tape.


This was concealed under the blue tie collar that I reattached.
(This process was tricky, frustrating and involved, so I'll spare you the details.)


After all the fitting changes were made,
it was time to connect the sleeves in earnest.


Because the sleeves were also attached with a French seam,
they ended up a little shorter than they ought to be.
The shirt was a little too stuffy with long sleeves anyway,
so I chopped off some length and made them 3/4 sleeves.


This of course left a raw edge,
with I trimmed with some of the blue scrap which
I collected from the hem of the shirt.


I attached the blue strip just like you would attach bias tape.
 
Once my shirt was finally done (!!!)
I turned my attention to the cream skirt.


To spruce up my skirt,
I simply straight stitched about a dozen rows around the bottom of the hem in deep blue thread,
varying the distance between each to create the appearance of bands.
I measured how far up I wanted my stitching to start, in my case it was 3 inches.
Then I made tiny marks all the way around so I had a guide for my fist row of stitches.
 
This was the same stitching method I used on my peplum top.
I really like it, I think it adds so much to a piece!
I'm tempted to go through my closet and do this to all my skirts!
 
And here it is finished up and paired together!


Here is the back.
 
 
With the shirt untucked, here is a better view of the pleats.


 In this photo shoot,
I have the shirt tucked in because it looked better that way with the skirt.
But I made sure to keep the length of the shirt a bit longer, since I have a long torso.
This top would also look great untucked with a pair of jeans or nice slacks!
 

 I really like how the sleeves turned out, trimmed in blue.
I'm really glad too that I shortened the length.
 
 
And here is close up of the hem stitching on the skirt.


Believe it or not, this outfit took all…stinking…week!
I seriously underestimated working with this silky polyester fabric,
which had me scurrying frantically to finish up what I thought was going to be a simple project.

 All in all, I really like the way my outfit turned out,
and I’m more than thrilled that I still have my sanity intact!
 
Now, head on over to The Renegade Seamstress
 
The overall winner and final placement of all four remaining
women will be determined by this week's scores and votes,
which will be announcement this Saturday!
Related Posts Plugin for WordPress, Blogger...