
Ok y'all,
I am seriously...positively...so excited to share this post with you!!!!
I haven't been doing this refashion thing very long at all,
barely dipped my toes into the sea of possibilities really,
but I think it is safe to say I am hooked!
Before I go into all of the lovely details,
I just have to show you first...I can't wait any longer!
This is my greatest project to date...completed over the course of two weeks.
Drum roll please.....

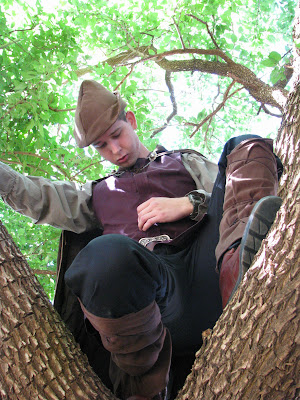
I made this medieval outfit!
The shirt, vest, hat, leggings, cape and even the cape clasp!
There.
Now that I got that out of my system,
we can get down to the nitty gritty of how it came to be and why.
I completed this project about a month ago, but it has just taken me this long to get it posted.
The awesome model in the picture is my brother Caleb.
See, he is working at a camp all summer long...they have chosen a medieval theme.
Every week they have a grand medieval banquet and dress up.
Thus, he needed an outfit.
Enter the sewing sister.
Originally we were going to buy a pattern and make it from scratch.
But when we started figuring the cost, it was a bit steep.
Then the light bulb came on...we could refashion one!
First things first, he went through some pictures and showed me exactly
what look he was going for.
These were the inspirations...

He liked the puffy sleeves and long vest.
Kind of a Robin Hood look.

He wanted the vest to lace up like this one.

Not having any tall boots...we planned to rig up something similar to this that would cover
some of his boots and go up his leg.
Armed with these mentally stored visual aides, we went shopping!
I think that is probably the first and last time
my brother and I have ever gone clothes shopping together!
It was rather comical going through the skirt rack looking for one that would work for a cape.
He was a great sport about...all business...conquer instinct and all that.
It didn't faze him that he was holding skirts up to himself and browsing the women's section.
I am seriously...positively...so excited to share this post with you!!!!
I haven't been doing this refashion thing very long at all,
barely dipped my toes into the sea of possibilities really,
but I think it is safe to say I am hooked!
Before I go into all of the lovely details,
I just have to show you first...I can't wait any longer!
This is my greatest project to date...completed over the course of two weeks.
Drum roll please.....

I made this medieval outfit!
The shirt, vest, hat, leggings, cape and even the cape clasp!
There.
Now that I got that out of my system,
we can get down to the nitty gritty of how it came to be and why.
I completed this project about a month ago, but it has just taken me this long to get it posted.
The awesome model in the picture is my brother Caleb.
See, he is working at a camp all summer long...they have chosen a medieval theme.
Every week they have a grand medieval banquet and dress up.
Thus, he needed an outfit.
Enter the sewing sister.
Originally we were going to buy a pattern and make it from scratch.
But when we started figuring the cost, it was a bit steep.
Then the light bulb came on...we could refashion one!
First things first, he went through some pictures and showed me exactly
what look he was going for.
These were the inspirations...
He liked the puffy sleeves and long vest.
Kind of a Robin Hood look.
He wanted the vest to lace up like this one.
Not having any tall boots...we planned to rig up something similar to this that would cover
some of his boots and go up his leg.
Armed with these mentally stored visual aides, we went shopping!
I think that is probably the first and last time
my brother and I have ever gone clothes shopping together!
It was rather comical going through the skirt rack looking for one that would work for a cape.
He was a great sport about...all business...conquer instinct and all that.
It didn't faze him that he was holding skirts up to himself and browsing the women's section.
This is what we came home with.

This olive green men's button shirt in a size 3X had no idea what was in store for it.
First, I did a lot of seam ripping.
I took off the collar, removed the buttons and the extra material strip for the button hole reinforcement (that is probably clear as mud).
I also dispensed with the cuffs.
Next I removed the sleeves.
I gathered them along the top then sewed them back on.

Like-a dis!
For the new cuffs, I used some extra material (I got it from taking in the sides of the shirt),
and added it the ends of the sleeves for extra length,
then sewed in some elastic to get the ruffled look.

Next I folded over the raw collar by about 1 inch and sewed it down.
I didn't snip around the edges, I just sort of gathered, pinned and sewed.
It created the perfect neckline for the peasant-y look, I think!


Then I sewed up the center of the shirt, leaving a V so he could slip it over his head.
After fitting it to him, I took in a little on the sides...he wanted it to be very roomy,
but the shirt was a 3X!

And that completed the shirt!
Next on the chopping block was the vest.

This pretty purple men's shirt in an XXL size was made
from a nice quality stiff fabric, perfect for that outer vest!
What followed was lots more seam ripping!
I removed the sleeves, the collar, and all of those buttons.
I folded and sewed the raw collar edge, then set to work tailoring the fit of the vest.
I took in a good bit on each side and under the arms.
What followed was lots more seam ripping!
I removed the sleeves, the collar, and all of those buttons.
I folded and sewed the raw collar edge, then set to work tailoring the fit of the vest.
I took in a good bit on each side and under the arms.

When sewing up the sides, I made a little flair, like in this picture, on each side
at the bottom of the vest.

Without really knowing what I was doing,
I tried to create a raised ridge on each sleeve....
it didn't really work, it just flopped over and looked like another seam.
Oh well...it was a good idea.
One my list of "Skills to Learn" is how to properly achieve that raised ridge look...thing.
And learn what it is called.

Next, I cut and hand sewed these button holes so he could lace up the top of the vest.
I had never sewn button holes before, and I have to say I am pretty proud of
how neat and clean they turned out!
And yes, that is blue thread...I did all of the sewing on the vest in blue...
it adds a little pop.
And...well, we didn't have purple thread and the nearest Wal-mart is over 1 hour away.
To close up the rest of the length of the vest, I used hook and eye clasps.


What came out from under my sewing machine was pretty exciting!
Two outfit pieces down!
I was working in order of priority, so the cape came next.
My idea for a cape was using a skirt, which I forgot to photograph in the 'before' stage.
Two outfit pieces down!
I was working in order of priority, so the cape came next.
My idea for a cape was using a skirt, which I forgot to photograph in the 'before' stage.
It remained largely intact however, so I didn't feel it was really needed.


The skirt we found for the cape was absolutely perfect!
Do you see how beautiful it is?!
It was similar to velvet, though I'm pretty sure it was a blend of some sort.
Do you see how beautiful it is?!
It was similar to velvet, though I'm pretty sure it was a blend of some sort.
The details and design...uh...it was spot on with the medieval look!
We almost didn't find this awesome skirt...it wasn''t hanging with the rest of the skirts,
but was hidden among the ladies suits.
I don't know why, but something made us go look through that section too.
but was hidden among the ladies suits.
I don't know why, but something made us go look through that section too.
It was destiny. :)
This was one of the easiest fixes yet.
I simply removed the zipper, took some material off of each side
so the cape didn't drown Caleb, and sewed up those raw edges.
The back of his cape is actually the front of the skirt.
Simple, yet stunning.
This was one of the easiest fixes yet.
I simply removed the zipper, took some material off of each side
so the cape didn't drown Caleb, and sewed up those raw edges.
The back of his cape is actually the front of the skirt.
Simple, yet stunning.
But that beautiful cape was still missing something...
and that was a cape clasp.
This part was fun, but a little outside my comfort zone.
I knew what it needed to look like and basically how it needed to function,
but getting it to happen took a little help.
and that was a cape clasp.
This part was fun, but a little outside my comfort zone.
I knew what it needed to look like and basically how it needed to function,
but getting it to happen took a little help.


I picked up a pair of big, old metal earrings for a quarter,
a necklace chain, and a couple of blank pins.
After some snipping, wire cutting, and hot gluing,
it came together!


My pins had a small little bar with holes in it, so what I did was
loop a link of the necklace chain over the earring post, stick the post through the hole on the pin,
put the 'butterfly' or back of the earring piece, on the post
and hot glued it all in place.
I did have to shorten the length of the chain to get the right 'droop' and lay.

This is what it looks like!!
*Fweww!*
Take a deep breath...we're almost done!
Last, I had to make a hat and rig up those leg coverings.
In our thrifting, I came across this pattern....

It was for children, but do you see that Robin Hood hat?
I figured I could change the sizing if need be, but that hat was a must.

From this simple brown skirt, I had the material I needed
to make the hat and both leg coverings.
No pattern adjusting was needed, the hat turned out great and came off easy!


Last but not least, the leggings.
With the measurements of how high Caleb wanted the to go up his leg,
and how wide they needed to be to wrap all the way around,
I made two simple rectangles.


I sewed a small tab at the center back for the string to go through.


Then all I had to do was tie three shoe lace lengths together
and criss-cross that over and around!
Simple, yet it adds so much!
And there you have it!!
A medieval refashion!
Now...enjoy some more epic shots from our fun photo shoot...


He was of regal bearing...


Lens flair...yes...I took these...


"Hi...how are ya...prepare for the smolder."
The total cost of this project came to about $16, including:
2 shirts
2 skirts
1 pair of earrings
1 pattern
ALL thrifted.
No pattern adjusting was needed, the hat turned out great and came off easy!


Last but not least, the leggings.
With the measurements of how high Caleb wanted the to go up his leg,
and how wide they needed to be to wrap all the way around,
I made two simple rectangles.


Then all I had to do was tie three shoe lace lengths together
and criss-cross that over and around!
Simple, yet it adds so much!
And there you have it!!
A medieval refashion!
Now...enjoy some more epic shots from our fun photo shoot...


He was of regal bearing...


Lens flair...yes...I took these...


"Hi...how are ya...prepare for the smolder."
The total cost of this project came to about $16, including:
2 shirts
2 skirts
1 pair of earrings
1 pattern
ALL thrifted.
We enjoyed this so very much!! Papa and I looked at it together......great job Des.....keep up the good work!!!
ReplyDeleteThanks, Nana and Papa! :)
DeleteThis turned out amazingly awesome!!!! I wish that I had seen this before I bought tons of material to make our own medieval costumes... :) Totally cool.
ReplyDeleteHello from New Mexico, by the way! So glad to see you started up a blog! I can't wait for future posts! And it will be fun to stay caught up with ya (because if we have to keep waiting for a wedding or something to bring us to Texas in order to see y'all, that would be a bummer!) ;)
Hello!! I'm so glad you found me. :) Thank you, I was surprised myself with how great it turned out. It was a fun project. LoL- yes, I agree, weddings are too few and far between for us to see each other enough. :)
DeleteThis is an awesome costume! Love that you are recycling things!
ReplyDeleteThanks, Christy! It is sooo much cheaper to reuse and upcycle than to buy fabric and make it from scratch. That is one of the main reasons why I love refashioning!
Delete